Battery switch on travel trailer function is crucial for managing your RV’s power. Understanding how these switches work—whether single-pole, double-pole, or double-pole double-throw—is key to safe and efficient power management. This guide breaks down the different types, their advantages and disadvantages, and how to safely connect and disconnect your batteries. We’ll also cover troubleshooting common issues and essential safety precautions.
Properly using your battery switch ensures your house and chassis batteries are correctly powered, protecting your appliances and preventing costly damage. We’ll walk you through the process step-by-step, covering everything from safe connection procedures to preventative maintenance tips to keep your system running smoothly.
Connecting and Disconnecting Batteries
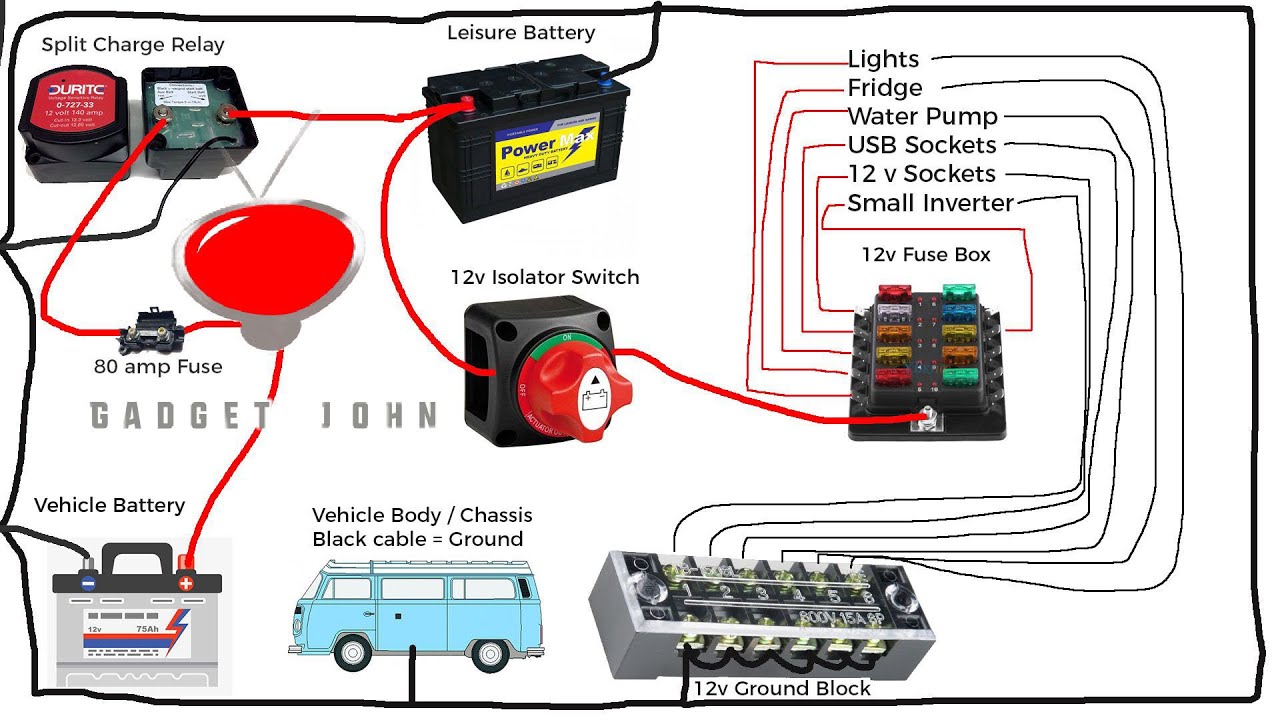
Properly connecting and disconnecting your travel trailer’s batteries is crucial for safety and preventing damage to your electrical system. A battery switch allows you to isolate the batteries from the trailer’s electrical system, protecting against accidental drain and facilitating maintenance. Understanding the correct procedure is essential.Connecting and disconnecting batteries involves using a battery switch, typically a two-position or three-position switch.
A two-position switch allows you to either connect both batteries to the trailer’s system or disconnect them completely. A three-position switch adds a “both” position where both batteries are connected, a “battery 1” position, and a “battery 2” position. This allows for charging or using one battery at a time, useful for extending battery life or managing charging if one battery is faulty.
Always refer to your specific switch’s instructions.
Battery Connection Procedure
Before beginning any work on your electrical system, always ensure the negative terminal of the battery is disconnected first. This minimizes the risk of accidental short circuits. Then, follow these steps:
1. Switch Position
So, you’re planning a trip? Awesome! Before you jet off, remember travel insurance is key. Check out this option for comprehensive coverage: aon travel insurance. They’ve got you covered for a lot of things, from lost luggage to medical emergencies. And if you want another perspective on travel insurance options, you might also want to check out aon travel insurance – sometimes a second opinion helps you make the best choice for your trip.
Don’t leave home without it!
Ensure the battery switch is in the “off” position. This isolates the batteries from the trailer’s electrical system.
2. Positive Cable
Connect the positive (+) cable from the battery to the positive (+) terminal of the battery switch. Ensure the connection is secure and tight.
3. Negative Cable
Connect the negative (-) cable from the battery to the negative (-) terminal of the battery switch. Again, ensure a secure connection.
4. Switch Activation
Carefully move the battery switch to the desired position (“both,” “battery 1,” or “battery 2” depending on your switch and needs).
Battery Disconnection Procedure
Disconnecting your batteries is just as important as connecting them correctly. The reverse order helps prevent accidental shorts. Here’s the procedure:
1. Switch Position
Turn the battery switch to the “off” position. This breaks the connection between the batteries and the trailer’s electrical system.
So, you’re planning a trip? Awesome! Don’t forget travel insurance – it’s a lifesaver. Check out Aon travel insurance for comprehensive coverage. They’ve got various plans, so you can find one that fits your budget and adventure level. And if you’re more of a visual learner, Aon travel insurance might have some helpful info presented in a fun, easy-to-understand way.
Seriously, don’t skip this step; peace of mind is priceless!
2. Negative Cable
Disconnect the negative (-) cable from the battery switch.
3. Positive Cable
Disconnect the positive (+) cable from the battery switch.
Hazards of Incorrect Procedures
Incorrect battery connection or disconnection can lead to several hazards. Connecting the negative cable before the positive can cause a spark, potentially igniting flammable gases near the battery. Loose connections can lead to overheating, potentially causing a fire. Failing to turn the switch off before working on the system can lead to electric shock. Always prioritize safety.
Illustrative Diagram
Imagine a simple diagram: A battery with a (+) and (-) terminal is connected via thick cables to a battery switch. The switch has three positions labeled “Off,” “Both,” and “Battery 1.” The switch’s output then connects to the trailer’s electrical system via two more thick cables. Connecting the batteries involves attaching the positive cable from the battery to the “in” positive terminal on the switch and the negative cable from the battery to the “in” negative terminal.
Disconnecting reverses this process, with the switch first moved to the “Off” position. The diagram visually reinforces the importance of connecting and disconnecting in the correct sequence, always beginning and ending with the switch in the “Off” position.
Safety Considerations When Using a Battery Switch
Working with a travel trailer’s battery system requires careful attention to safety. Improper handling can lead to serious injury from electrical shock, burns from battery acid, or even explosions. Understanding the risks and taking appropriate precautions is crucial before you even touch the battery or switch.
Risks of Electrical Shock and Battery Acid Exposure
Electrical shock poses a significant danger when working with any electrical system, including a 12-volt DC system found in most travel trailers. Even a seemingly low voltage can cause muscle contractions, burns, and in severe cases, cardiac arrest. Battery acid, a corrosive sulfuric acid solution, is another serious hazard. Contact with skin or eyes can cause severe burns, requiring immediate medical attention.
Inhalation of battery acid fumes can also irritate the respiratory system. Always treat batteries with respect, recognizing their potential to cause harm.
Essential Safety Equipment, Battery switch on travel trailer function
Before working on your travel trailer’s battery system, gather the necessary safety equipment. This includes:
- Safety glasses or goggles: These protect your eyes from splashes of battery acid.
- Rubber gloves: Insulating gloves protect your hands from electrical shock and chemical burns from battery acid.
- Ventilation: Work in a well-ventilated area to avoid inhaling potentially harmful battery fumes. If working indoors, use a fan to ensure good airflow.
- Insulated tools: Use insulated screwdrivers and wrenches to prevent accidental shocks.
- Baking soda and water: Keep these readily available to neutralize any battery acid spills.
Best Practices for Safe Battery Handling and Switch Operation
Safe battery handling and switch operation are paramount. Following these best practices will significantly reduce the risk of accidents:
- Always disconnect the negative (-) battery terminal first when working on the battery system. This helps prevent accidental short circuits and shocks.
- When connecting or disconnecting the battery, make sure the switch is in the “OFF” position.
- Never wear loose clothing or jewelry that could get caught in moving parts or create a short circuit.
- Inspect the battery terminals and connections for corrosion before connecting or disconnecting. Clean them thoroughly with a wire brush if necessary.
- Keep a fire extinguisher nearby, rated for electrical fires (Class C). While rare, battery fires can occur.
- If a battery acid spill occurs, immediately neutralize the spill with baking soda and water, then carefully clean the area. Seek medical attention if you come into contact with battery acid.
- After completing any work on the battery system, always reconnect the positive (+) terminal last, ensuring the switch remains in the “OFF” position until ready for use.
Mastering your travel trailer’s battery switch is all about safety and efficiency. By understanding the different switch types, connection procedures, and potential troubleshooting steps, you’ll be confident in managing your RV’s power. Remember to always prioritize safety, follow the correct procedures, and perform regular maintenance to keep your system running smoothly for years to come. Happy travels!
Essential FAQs: Battery Switch On Travel Trailer Function
What happens if I accidentally connect the batteries incorrectly?
Incorrectly connecting batteries can lead to blown fuses, damaged appliances, or even a fire. Always double-check your connections before turning on the switch.
How often should I check my battery switch and connections?
Inspect your battery switch and connections at least every three months, or more frequently if you use your trailer regularly in harsh conditions. Look for corrosion, loose connections, or any signs of damage.
My battery switch is stuck. What should I do?
Try lubricating the switch mechanism with a suitable lubricant. If it’s still stuck, you might need to replace the switch. Consult a qualified technician if you’re unsure.
Can I use a battery switch from a different RV?
While possible, it’s best to use a battery switch that’s rated for the voltage and amperage of your RV’s system. Using an incorrect switch can lead to safety hazards.
